If you’re new here & you’re curious about our renovation, start here.

Before I share the details behind our kitchen elevations, I do want to apologize for the leaving your hanging with regards to our kitchen renovations. Life has been pretty nutty behind the scenes over here, I won’t lie! Taking deep breaths, prioritizing things in order of importance, all while attempting to protect my peace and ensuring my mental health stays afloat has been my focus. Throw in the glorious holiday madness (and all of the holiday content that I most certainly wasn’t going to miss posting) and, alas I’m so far behind on these updates! But no longer. Things are slowly getting back to normal and I have so much to share and I’m excited to be spilling it all (with no further delays, pinky promise).
SHOP THE POST:
We moved back into our home post-reno in November and though we are 95% there we are still not quite done. It is fully useable (which is so glorious) but a few items are still trickling in as we speak, and I get more and more excited every time I tear open a package. Our new kitchen has already been such a dream, it has been the most glorious upgrade and I can’t wait to unveil it all.
Before I do, let’s go back a little to give you an idea of the design process. One mistake that I have continued to make for myself over the years is to not treat my own projects like I treat those of my clients. I have mastered my process over the years and, let me tell you, it works. So this time around I didn’t cut corners or power through a thing. I really did take my time with the designs, and I can tell you it paid off (I don’t regret a thing thus far, which isn’t fair to say for other projects I’ve done in our home in a rush).
READ NEXT: Our Kitchen Finishes
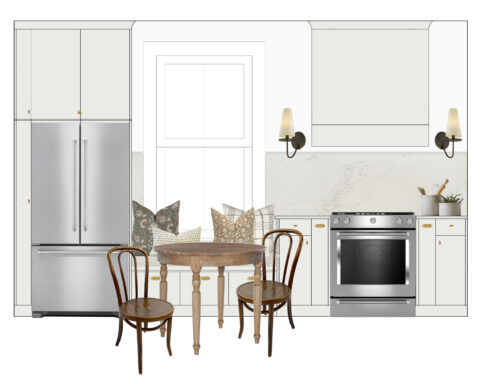
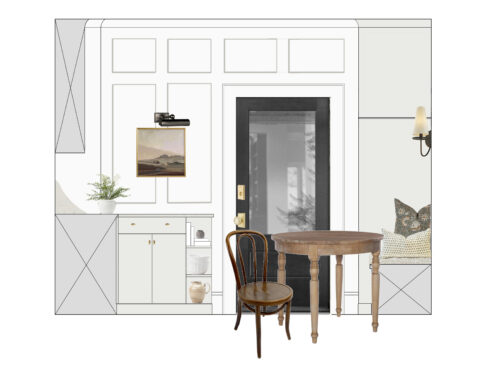
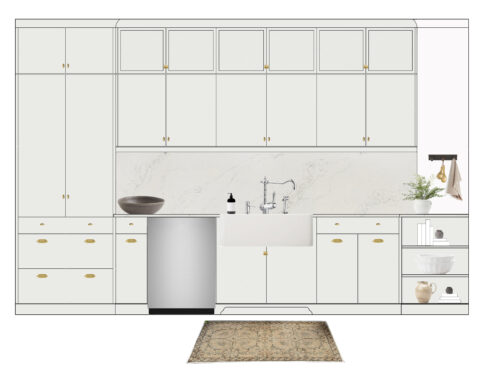
I am such a visual person so early on in the kitchen design process I put together these to scale kitchen elevation drawings to help get my thoughts onto paper. The perspective drawing I did certainly helped iron out the designs (you can see that here!). But there’s nothing like to scale elevations, rendered in colour, to really get my thoughts onto paper. Funnily enough, I’ve found it particularly helpful to visualize everything as I wrap up the finishing details (accessories, art, and things of that nature). So without further ado, here they are:

{North Kitchen Elevation}

{West Kitchen Elevation}

{South Kitchen Elevation}
My goal was to create a space that feels timeless, comfy and cozy – slightly elevated, but completely approachable in every sense of the word. Now that we’re just about finished (I’m sitting in that window bench as we speak – it is the best spot in the house now, as far as I’m concerned), I can tell you firsthand that the elevations translate beautifully in real life. They’ve been such a great tool in my arsenal to help me finalize decisions without any fear. And I’m just beyond thrilled with how it’s all ironing out.

SOURCES

FIXTURES, FINISHES & APPLIANCES
Faucet & Side Spray: DXV | Soap Dispenser: DXV | Apron Sink: DXV | Fridge: Kitchenaid | Dishwasher: Kitchenaid | Stove: Kitchenaid | Flooring: Fuzion| Counters: Hanstone Quartz, Montauk
LIGHTING & HARDWARE
Cabinet Knob: Schaub, in satin brass | Cabinet Cup Pull: Schaub, in satin brass | Cabinet Latch: Emtek, in satin brass | Electronic Lock: Emtek | Door Knob & Rosette: Emtek | Wall Hooks: Emtek | Electronic Lock: Emtek | Wall Sconce: Capitol Lighting | Picture Light: Capitol Lighting
FURNITURE, ART & ACCESSORIES
Bench Cushion: Custom | Bench Fabric: Tonic Living| Rug: Etsy | Vintage Oil Painting: Etsy | Framed Art: Minted | Green Floral Pillow: SWD Studio | Camel Floral Pillow: SWD Studio | Ditsy Floral Pillow: SWD Studio | Plaid Pillow: SWD Studio

RELATED POSTS

START HERE: OUR RENOVATION PLANS
OUR EXTERIOR RENOVATION PLANS
A RENOVATION UPDATE (THE PIVOT)
OUR KITCHEN INSPIRATION
OUR KITCHEN DRAWINGS
A CONSTRUCTION UPDATE
OUR KITCHEN FINISHES
filed in /


Looks wonderful, Jacquelyn!
Can’t wait to come over for a cup of tea next time we visit.
Love,
Aunt Donna
The thought makes me so happy!
Can’t wait to see real pictures!!
Thank you!! ME TOO haha